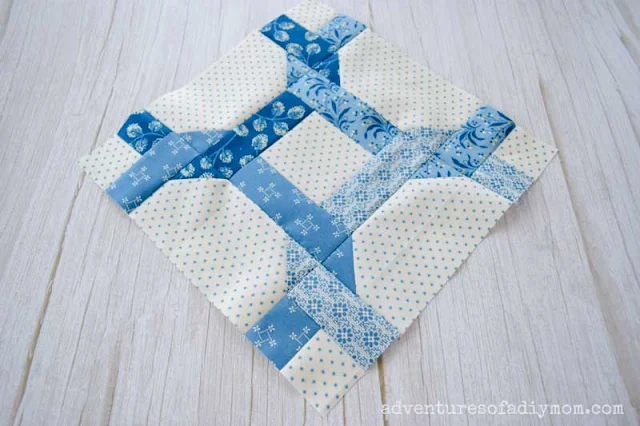
The Celtic twist quilt block is one of those blocks that looks so hard.
It's intricate and full of movement.
The pieces seem to be woven.
It's a fascinating block to look at.
And guess what? It's not as hard as it appears.
I'm going to break it down into easy manageable steps so that you can make this complicated-looking block even if you're new to quilting. 
The Celtic twist block is made up of a variety of rectangles and squares.
You will need a background fabric and four different fabrics for the twists.
I opted to go with blues from the Perfect Union line by Edita Sitar of Laundry Basket Quilts.
CELTIC TWIST QUILT BLOCK
This post may contain affiliate links. As an Amazon Associate I earn from qualifying purchases. Please see my full disclosure policy for details.
SUPPLIES NEEDED FOR QUILTING
Before we get started, let's talk about quilting supplies.Listed below are my go-to quilting items.
They are just the basic tools that you need to get started.
This quilt block does not require any extra tools beyond the basics.
- fabric
- thread
- rotary cutter / cutting mat / straight edge
- sewing machine (This is my new machine that I absolutely love!)
- sewing scissors
- pencil
- iron and wool ironing mat
FABRIC REQUIREMENTS FOR A 12" CELTIC BLOCK
The Celtic block consists of a background fabric and four additional fabrics in coordinating colors to create the twists of the block.I had some fat quarters that I used, but you can use whatever scraps you have.
If you learn better by watching, here's the video.
Here's the cut list for this block.
BACKGROUND COLOR
- 4) 3 1/2" X 6 1/2"
- 1) 3 1/2" X 3 1/2"
- 4) 2" X 2"
TWIST COLORS
Choose 4 colors for the twists and cut the following from EACH fabric.- 1) 2" X 5"
- 1) 2" X 3 1/2"
- 3) 2" X 2"
HOW TO MAKE A CELTIC TWIST BLOCK
The Celtic twist quilt block is not hard to make. The biggest challenge is to make sure the pieces stay arranged correctly.To begin with, make the center square. Select the 3 1/2 inch background square and the four 2" X 5" rectangles.
Arrange the strips around each edge of the square. At this point, the placement of the rectangles is personal preference.
As we build upon this piece, the placement of the remaining pieces becomes crucial.
Note: All seam allowances are 1/4 inch. Remember RST - Right sides together when sewing.
Select the top strip and the square. Line up the strip along the side of the square with one edge flush with the square's edge.
The other edge will overhang.
Sew along the side, starting at the flush edge. Leave 1/2 inch unsewn at the end of the square.
Press towards the rectangle.
Sew the next rectangle strip to the right side of the square. Press towards the rectangle.
Sew another rectangle strip to the bottom of the square. Press towards the rectangle. Next, fold back the first strip, place the last strip along the left side of the square. Sew it in place. Press toward the rectangle.
Fold down the top strip and finish off the seam.
Press towards the rectangle.
Next, it's time to carefully arrange the remaining pieces so that we end up with the twisted look.
It's super helpful to have a design board that you can rotate as you work on each side. I don't have one (yet; it's on my to-do list to make one). For the video, I used my ironing mat. Find a tray or a piece of cardboard to use as a design board.
Begin by placing the background rectangles on each side of the square.
Then work one side at a time. I started at the bottom. Select the remaining fabric pieces that match that bottom horizontal strip on the center square.
Place two of the small squares on the inner bottom corners of the background rectangles. (These will be sewn to the corners as triangles.)
Place the rectangle piece on the left side of the bottom background piece.
Place the remaining square on the right of the bottom background piece. Line it up along the bottom of the square, leaving a space.
Next rotate the block so another side is at the bottom and repeat the process until all pieces are laid out.
Next, create the triangle corners on the background rectangles.
To do this, flip the squares so they are upside down (RST).
With the square on top, sew the pieces together, sewing from one corner of the square to the other corner.
Repeat with the other square.
Trim the triangle piece off the corners of the rectangle 1/4 inch from the seam.
Press towards the triangles.
Repeat with all four sides of the block.
The last units we need to make are the corner units.
Sew together the two squares. Press away from the background square.
Sew the rectangle to the squares. Press towards the rectangle.
Pay attention and keep things oriented correctly as you do this.
Now that all the units are sewn together, it's time to assemble the block.
Lay out the block and make sure all of the pieces are oriented correctly.
Sew it as you would a nine-patch block.
Sew the pieces of each row together. Press the top and bottom rows toward the edge. Press the middle row toward the middle.
Sew together the rows, nesting the seams as you go for perfect points. Press the block flat.
There you have it. There are a lot of pieces, but if you lay it out and work carefully, you can complete this gorgeous Celtic twist block.
Want to watch the video? ↓↓Click the link ↓↓
MORE QUILT BLOCK TUTORIALS
Don't forget to pin it!!


0 comments