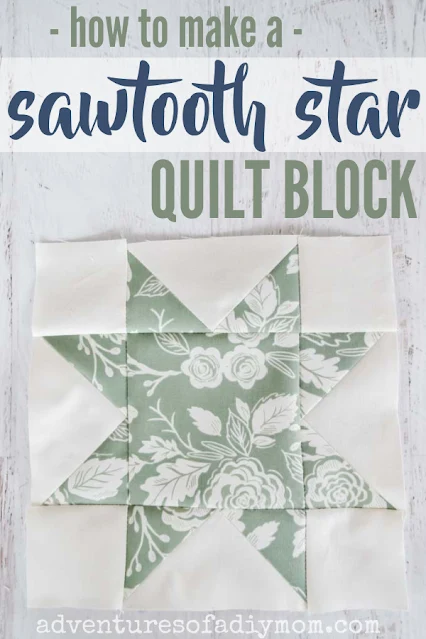
Today we are learning to make a classic sawtooth star quilt block. This block features a large center square surrounded by flying geese to create the star points.
Make this star block in 7 different sizes with the free printable cut list and instructions.
SAWTOOTH STAR QUILT BLOCK
I recently made a baby quilt for my niece's newborn. It's made of two blocks, this sawtooth star and a 16 patch block to create a beautiful pattern.
I'll be sharing the finished quilt and the quilt pattern soon. Click here for more baby boy quilt patterns, or here for baby girl quilt patterns.
If you love star quilts, check out these star quilt blocks.
This post may contain affiliate links. As an Amazon Associate I earn from qualifying purchases. Please see my full disclosure policy for details.
SUPPLIES NEEDED FOR QUILTING
Below are some quilting supplies I used in this project. I strongly recommend a cutting mat, rotary cutter and straight edge as well as a flying geese ruler. There are lots of them out there. I use the 'quilt in a day' brand. Others will work too.- fabric
- thread
- rotary cutter / cutting mat / straight edge
- sewing machine (This is my new machine that I absolutely love!)
- sewing scissors
- pencil
- iron and ironing board
- large flying geese ruler
FABRIC REQUIREMENTS FOR A SAWTOOTH STAR QUILT BLOCK
Each block features a star made from a colored fabric. The rest of the block is a background fabric, white in this case.You can also check out this variation of the sawtooth star for a slightly different look.
The block starts out with four different sizes of fabric squares.
Below are the square sizes and quantities you will need for an 8 inch block, which is what I'm making today.
Colored Fabric
- 1) 3 1/8" square
- 4) 4 1/2" squares
Background Fabric (white)
- 4) 2 1/2" squares
- 1) 5 1/2" square
Making another size? Check out the list below of the fabric requirements for other common block sizes.
Cutting measurements for 6 inch block:
- Color - 1) 3 1/2" square
- Color - 4) 2 5/8" squares
- White - 1) 4 1/2" square
- White - 4) 2" squares
Cutting measurements for 9 inch block:
- Color - 1) 5" square
- Color - 4) 3 3/8" squares
- White - 1) 6" square
- White - 4) 2 3/4" squares
Cutting measurements for 10 inch block:
- Color - 1) 5 1/2" square
- Color - 4) 3 5/8" squares
- White - 1) 6 1/2" square
- White - 4) 3" squares
Cutting measurements for 12 inch block:
- Color - 1) 6 1/2" square
- Color - 4) 4 1/8" squares
- White - 1) 7 1/2" square
- White - 4) 3 1/2" squares
Cutting measurements for 16 inch block:
- Color - 1) 8 1/2" square
- Color - 4) 5 1/8" squares
- White - 1) 9 1/2" square
- White - 4) 4 1/2" squares
Cutting measurements for 18 inch block:
- Color - 1) 9 1/2" square
- Color - 4) 5 5/8" squares
- White - 1) 10 1/2" square
- White - 4) 5" squares
I've created a printable chart for easy reference. Scroll to the bottom to grab it.
HOW TO MAKE A SAWTOOTH STAR QUILT BLOCK
The sawtooth star is made up of a large square center and surrounded by flying geese units to create the points. The corners are small background squares.The hardest part is making the flying geese. I'll be honest, flying geese used to intimidate me. But this method is easy. They're slightly oversized, so once they're trimmed up they're always perfect.
I've made a video if you learn better by watching.
MAKING THE FLYING GEESE UNITS
Begin making the flying geese blocks. This flying geese method is used to make four at once.
Select the large white square and the 4 smaller colored squares.
Draw two lines on the back of each colored square. These lines are 1/4 inch away from the center.
I line up the quarter inch markings on a ruler with the points of the square. Then draw a line. Turn the square and draw a line on the other side.
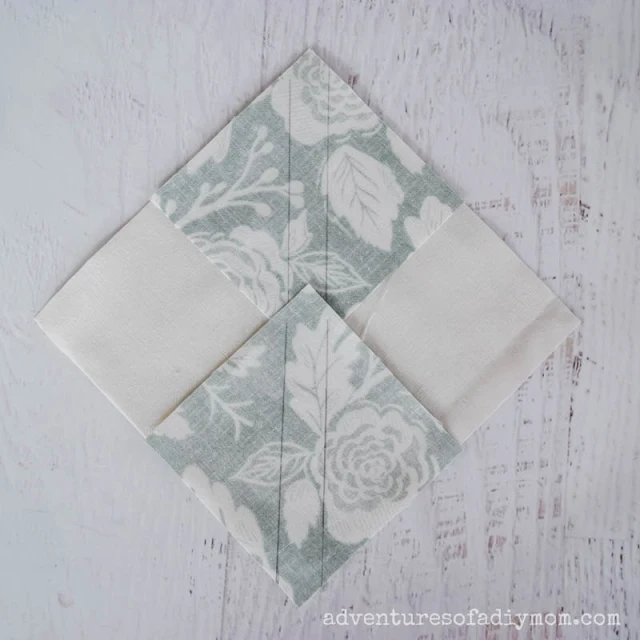
Place two of the colored squares at opposite corners of the white square. The middle will overlap.
Sew along the lines and then cut down the center of the square from corner to corner between the two sewn lines.
Press open with the seam toward the colored fabrics.
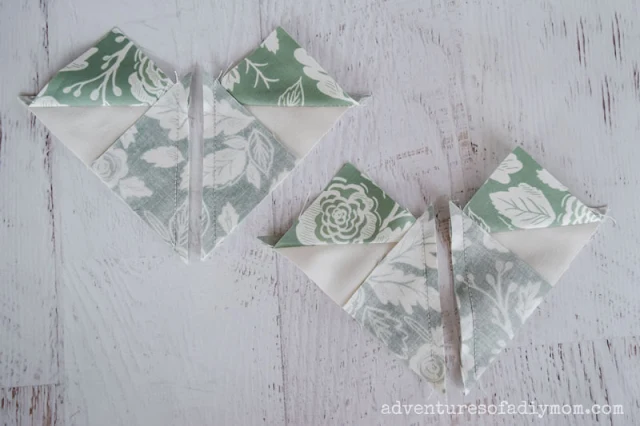
Place the last two colored squares on the remaining white corner with the lines vertical.
Again, sew along the lines. Cut between the lines.
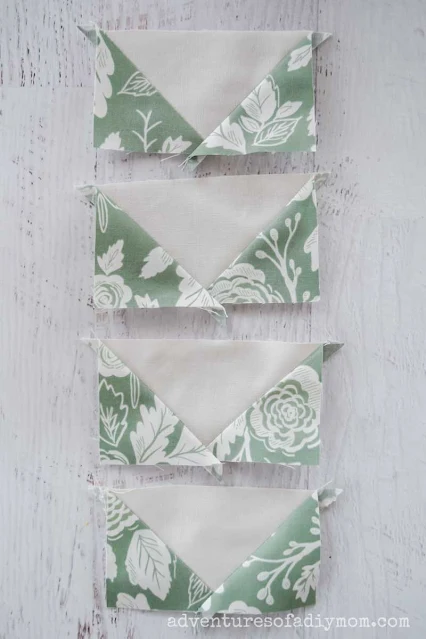
Press each unit open with the seam toward the color.
Using a flying geese ruler, trim up the block to create the perfect flying geese unit.
ASSEMBLING THE SAWTOOTH STAR BLOCK
Once you have made your flying geese, let's put together the star blocks.Lay out all the pieces to the sawtooth star.
The large colored square is the center block, the four small white squares in each corner and the flying geese on each side with the points out.
At this point, sew it together like you would a nine-patch using a quarter inch seam allowance.
Sew together each row. Then sew the rows together.
If you always press away from the points, your seams will nest perfectly.
Here's a fun twist on this block if you line up the points towards the center instead of outward. Kinda cool and a completely different look.
Want to watch the video tutorial? ↓↓Click the link ↓↓
MORE FAVORITE QUILT BLOCK TUTORIALS
Visit my quilting page for all my quilting tutorials.MORE QUILT PATTERNS
For all the quilting pattern ideas visit my quilting page. Here's a few that might interest you.- Baby quilt patterns
- Star quilt patterns
- EASY quilt patterns
- Layer cake quilt patterns
- Charm pack quilt patterns
Don't forget to pin it!!


Thank you for the chart, it will be very useful too.
ReplyDelete