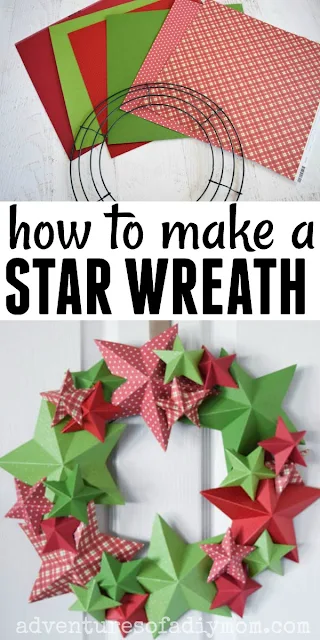
I have been wanting to make something like this for a while now. Ever since I first learned how to make 3D paper stars, I've thought about making a wreath with them.
I'm loving how it turned out. The different colors of paper really make it pop.
I obviously made this wreath for use at Christmastime. But you could do a patriotic wreath with red, white and blue stars too!
Welcome to the 5th annual 12 Days of Holiday Ideas event, hosted by Shirley of Intelligent Domestications and Erlene of My Pinterventures Between Nov. 11th and December 6th there will be hundreds of new ideas shared by over 55 Co-host bloggers!
Be sure to see our kick-off collection of Holiday ideas as well as all of this years talented participating DIY and Foodie Blogs. Download this years November and December calendars with all of the topics and dates so you can make plans to watch for ideas!
This year, I am participating in just four of the days. Today is all about DIY Wreaths. Take a minute to check out last years poinsettia wreath. This year I made a star wreath.
PLUS - We are hosting a BIG GIVEAWAY from our Sponsors this year! Be sure to scroll all the way down for more information and to enter to win!
DIY STAR WREATH
↓ ↓ ↓ PIN IT ↓ ↓ ↓
This post may contain affiliate links. Please see my full disclosure policy for details.
SUPPLIES NEEDED FOR STAR WREATH
- a variety of colored and patterned paper (you will need 11-12 sheets)
- wreath form
- hot glue gun and glue
- scissors
HOW TO MAKE A 3D PAPER STAR WREATH
Making the stars for the wreath is fairly simple. I will admit that the actual gluing is a bit challenging because there is not a lot of surface area to glue to. It took some patience on my part.
To learn to make the 3D stars, please watch this video. I explain it in detail and walk you through the whole process multiple times.
- Make 6 large stars using 8 1/2" X 11" sized paper.
- Make 18 small stars using 4" X 6" sized paper.
- Add the large stars evenly around the wreath form and hot glue in place
- Add the small stars between the large stars to cover all the gaps. Overlap stars as needed. Glue in place.
I tried my best not to have a lot of the same color/pattern right next to each other. I only had two greens, both solid, so they were harder to separate from each other.
Tip for saving paper:
Folding and cutting the paper to make the stars results in a lot of wasted paper. Another option would be to create one star as shown in the video. Then use it as a stencil and trace it onto the paper. Cut it out. Then score and fold the points.
This is actually how I ended up doing most of the stars because I did not purchase enough paper. It does takes longer to have to trace and then cut them all out than it does to fold the paper and make a single cut, so be aware of that. I figured another trip to the store would probably take the same amount of time so I went for it.
Because of the nature of the wreath being made from paper, indoor use is recommended. I will probably hang mine off my pantry door to add some Christmas cheer to the kitchen.
Want to watch the paper stars tutorial? ↓↓Click the link ↓↓
More Christmas Crafts
- Ruffle Christmas Tree Skirt
- Days Til Christmas Sign
- Wooden Triangle Christmas Trees
- Candy Cane Star
- Christmas String Art
- Acrylic Christmas Ornaments
Don't forget to pin it!!


lovely idea with the stars so festive and colorful
ReplyDeleteI love that you included a how-to video since I'm not very crafty. I love everything about this wreath and that I can also make a red, white and blue one for the 4th of July.
ReplyDeleteYour paper wreath is really cute, Rachel! Love the combination of papers you used.
ReplyDeleteI bought one of those pads of Christmas paper last year on clearance. This will be perfect to use some of that! Pinned!
ReplyDeleteWhat a fun activity to make this wreath! Looks adorable!
ReplyDeleteYour wreath is so fun! I'm a little obsessed with stars, so I definitely want to make these!
ReplyDeleteIt's beautiful! The paper stars are so pretty. I can't wait to make some now.,
ReplyDeleteBeautiful wreath! I love the colours and patterns you chose for the stars!
ReplyDeleteI love the stars! I have a lot of Christmas scrapbook paper, so I think I will have to make some--if not for a wreath, maybe a garland!
ReplyDeleteI have a ton of scrap paper. I should make a summer wreath like this and get my girls involved :-) Pinned.
ReplyDeleteI've always loved those paper stars. They look beautiful done in a wreath!
ReplyDeleteI like your blog & video both. Thanks for sharing it with us.
ReplyDelete