It's one of those holidays that often get skipped. Thanksgiving! Maybe it's not as exciting as other holidays. But I feel it's super important to take a step back from the "how much candy can I get on Halloween" and the "I really want this for Christmas" to reflect on "how much I already have" and "how many good people are in my life". I truly believe we can't be happy if we're not grateful for our lives as they currently are.
I am starting a grateful challenge on my Facebook page from now until Thanksgiving. I'd love you all to join in. There will be a prompt each day where we can share what we are grateful for about specific things. Some prompts will be fun and some a little more reflective. I hope it will be a good experience and a way to get to know each other better.
One of the things I'm so grateful for is the ability to create things. It's one of my absolute favorite things to do. So let's get creating!
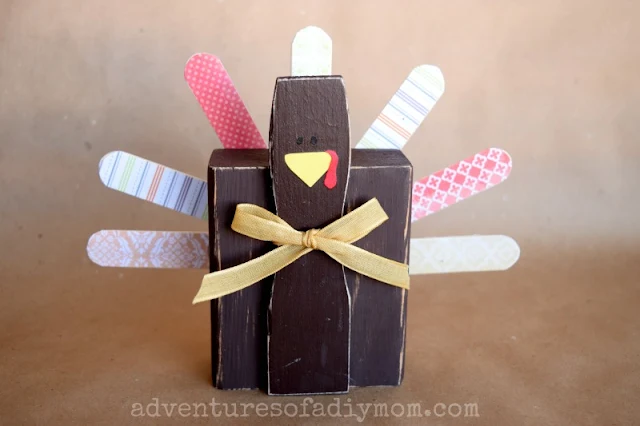
Easy Turkey Craft for Thanksgiving Decor
Last year, I needed to come up with a craft for the young women in my LDS ward. I'm in charge of a group of 12-13 year olds and each week we have an activity. We do all sorts of different things, but for this particular night they wanted to do a Thanksgiving craft. After searching for ideas, I came across this fun 2X4 turkey at Artsy Fartsy Mama.
Supplies you will need for your turkey craft:
2 X 4 - cut to 4 incheslarge paint sticks - cut to 5 1/2 inches {you want to use the end with the curves}
large popsicle sticks - cut in half
paint
scrapbook paper
mod podge
ribbon
sandpaper
hot glue
black marker
pencil
How to make your wooden turkey:
1. Begin by painting your 2X4 and paint stick, once dry sand down the edges a bit with a piece of sandpaper2. Trace the popscicle stick onto the scrapbook paper. Cut out, then mod podge the paper to the stick. I like to add a layer of mod podge on top of the paper as well.
3. Tie a ribbon around the turkey's neck.
4. Hot glue the neck to the body's front, with the bottom of the pieces flush and the neck centered from side to side.
5. Hot glue the tail to the body's back. I found that it was best to arrange the sticks on the table, checking to make sure they were lined up evenly. I held the body on top to check if they were placed right. Then quickly added a dab of hot glue to each stick and placed the body on top of all the sticks at the same time.
6. Add a face. To do this, I used colored paper and drew a beak and snood. Then I mod podged them on and drew two dots with a marker for eyes.
There you go, your own little turkey decoration!
Be sure to follow my facebook page to join the gratitude challenge!
See all my fall craft ideas here.
Don't forget to pin it!
More Thanksgiving Crafts
- DIY Thankful Journals
- DIY Fabric Turkey Decoration
- Pumpkin Spice Donut Treat Bag
- Thankful Embroidery Craft
- Wooden Faux Wooden Pumpkins
- Fall Napkins
- Turkey Placecards
- Easy Fall Garland
- Thanskgiving SVG cut files
- DIY Turkey Salt and Pepper Shakers
- Book Page Pumpkin
- Paper Plate Pie Garland
- Toilet Paper Pumpkins
- 75+ Fall Crafts
Don't forget to pin it!


0 comments