Although the fabric is woven and looks complex, once you learn how to set up the fabric, it is really only 4 straight seams and you're done.
Easy Fabric Hot Pad - Beginner's Sewing Project
This post may contain affiliate links. As an Amazon Associate I earn from qualifying purchases. Please see my full disclosure policy for details.
Supplies for Fabric Hot Pad
You will need:
- 6 pieces of fabric 9" X 9" {I used 3 each of two different patterns}
- 1 piece of Insul-Bright Needlepunched Insulated Lining -45" x 1 yard
9" X 9"
- thread
- sewing machine
- scissors
- iron
How to Make your Easy Fabric Hot Pad
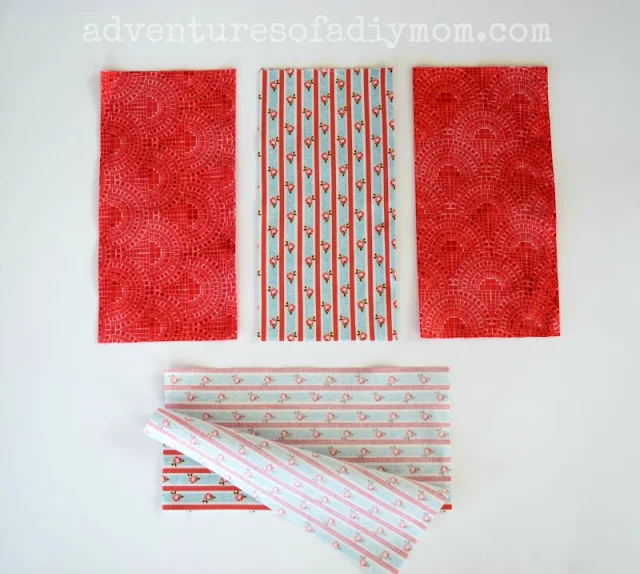
Let's do this!Begin by cutting out your fabric into 9" X 9" pieces. I cut three each of two different fabrics.
Also cut out one piece of insulated lining into a 9" X 9" piece
{Don't know where to buy insulated lining? You're local craft or fabric store should have it. Or try this affiliate link -- Insul-Bright Needlepunched Insulated Lining -45" x 1 yard
Next take four pieces of the fabric, fold them in half and press with a hot iron. {I folded two of each color}
Now we need to layer the pieces. Begin with your full, unfolded pieces. Lay down one piece of fabric with the right side down, place the insulated lining on top, then the other unfolded piece of fabric on top with the right side up.
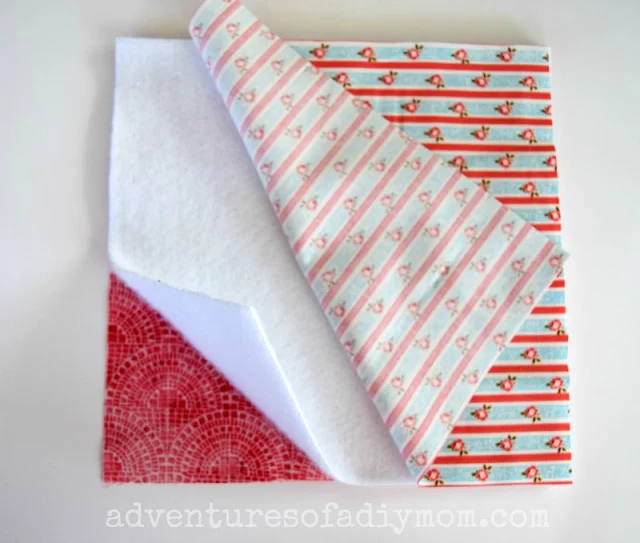
Next we will create the interwoven top. With all of these next steps, be sure to place the folded side of the fabric at the center of the hot pad.
Place a folded fabric pieces {red} on the right side of the hot pad, keeping the fold in the center.
Place the striped fabric along the top side.
Add another red piece on the left side.
Place the final striped fabric on the bottom, lift up the red fabric in the bottom corner and tuck the striped fabric underneath.
Double check that all your pieces have the fold in the center and not on the edge. {Yes, I did not do this with one of my pieces and had to unpick - I'm trying to help you avoid my mistake}
Now it's a few quick straight seams along all four edges. Use a 5/8 inch seam allowance.
Note: I did not pin the pieces together and the fabric slid a bit. So I would recommend pinning the pieces together to keep your seams straight and the fabric in place.
Lastly we will turn it right side out and the hot pad is done! I made a quick video showing this step.
Pretty easy right?!
You may also like these crocheted hot pads from my archives:
And a few more fun summer sewing projects:
Toddler Apron and Toy Oven Mitt - Peekaboo Pages
17 Easy Sewing Projects - Tip Junkie
This post is part of a collaboration with other sewing bloggers. Before you go check out all the other fun posts that went up today and head over to Life Sew Savory for all the Summer Fun series posts...
Toss and Go Quilt Game - by Hem Me In
Easy Fabric Hot Pad - Adventures of a DIY Mom
Easy Magicians Cape - Sew What Alicia
Fun Summer Frock - Serger Pepper Designs
Raglan Pool Cover Up - Call Ajaire
Seashell Collection Bag - Swoodson Says
Toss and Go Quilt Game - by Hem Me In
Easy Fabric Hot Pad - Adventures of a DIY Mom
Easy Magicians Cape - Sew What Alicia
Fun Summer Frock - Serger Pepper Designs
Raglan Pool Cover Up - Call Ajaire
Seashell Collection Bag - Swoodson Says


I love how this turned out!! thanks so much for sharing in my summer fun series!!
ReplyDelete