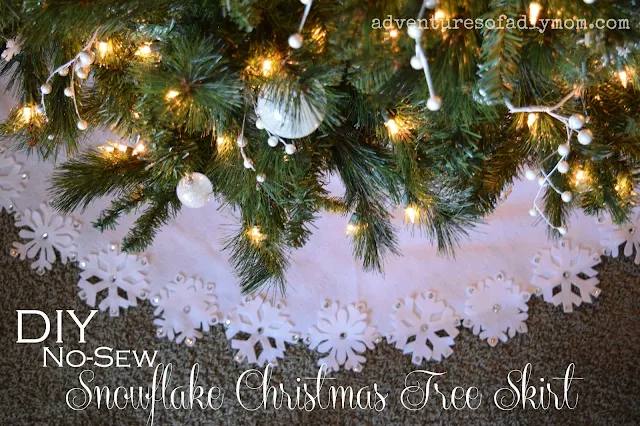
The skirt goes perfectly with the kids tree in the basement, but doesn't really match the white look that I have going on upstairs.
So it was time to make myself a new one. I needed something easy, inexpensive and I didn't feel like sewing.
I opted to go with a felt skirt, with an edging of snowflakes. I will say that although making the skirt was easy, it took a lot more time than I anticipated.
DIY NO-SEW CHRISTMAS TREE SKIRT WITH FELT SNOWFLAKES
For many years I have taken off almost the whole month of December from blogging.It's the busiest time of the year and I feel a bit overwhelmed by trying to blog as well as keep up with all the extra stuff going on at this time of the year.
However that doesn't mean that I haven't created Christmas crafts and projects. Recently, I conducted a survey. Through that, it was pointed out that I don't have very many Christmas or Holiday crafts on my blog. It's not that I don't make them. I do!
But I usually run out of time to write up a tutorial for them. Today's Christmas tree skirt is such a project. I made it two years ago, and had the best of intentions to share it last year and never did. So here you go!
Find more Christmas tree skirt patterns here.
Update: I have recently created another tree skirt, this time with a ruffle. Go check it out.
HOW TO MAKE A NO-SEW SNOWFLAKE CHRISTMAS TREE SKIRT
You will need:felt
sharp scissors
packing tape
gems
sequins
hot glue
tacky glue
snowflake template
I apologize that I don't have step-by-step pictures... I'll do my best to explain it well.
First of all you need to create a circle shape. Fold you fabric in half diagonally, then in half again. Then fold a couple more times to create a triangle shape. Next draw a curved shape on the wide end. This is where you cut. For a better explanation with pictures head over to Design Sponge. She also explains how to determine size.
Once I had my circle, I cut a straight line from the edge to the center.
Now it was time for the snowflakes. I found a few snowflakes that I liked from the Silhouette store and cut them out onto cardstock on my machine. You could totally do a search and then print and cut them out.
I used three different snowflake shapes.
Next is my favorite tip that I learned during this project. Have you cut out intricate shapes on felt before? For me, it always flops around and the end result is not always how I picture it.
So here's my tip. If you place packing tape over the design and the felt, then cut through the tape and the felt together, the tape holds the felt in place and you end up with perfectly cut out snowflakes.
Since I was making a lot of them, I just reused the snowflake template by adding another layer of packing tape each time I cut.
After hours of cutting, I was ready to assemble my tree skirt.
I used a hot glue gun to assemble. I added a dot of glue in the center of each snowflake and at the points that were touching the skirt.
To add a little sparkle, I attached clear, silver-backed gems to the center of each snowflake and then a sequin to the points of each snowflake.
I used hot glue for the gems and tacky glue for the sequins. It has held up really well. After two years, only one sequin has fallen off. It was easy enough to replace.
.
The end result! It's simple, clean lines are enhanced with just enough sparkle. I love how the sequins and gems catch the light from the tree.
Although it took longer than expected, it was totally worth it. I absolutely love this Christmas tree skirt and it will be used for many years.


.jpg)
So pretty! Love those snowflakes!
ReplyDeleteAlso, I just wanted to let you know that I emailed you about joining my creative team at A Glimpse Inside so if you don't see an email in your inbox, check your junk folder. :)