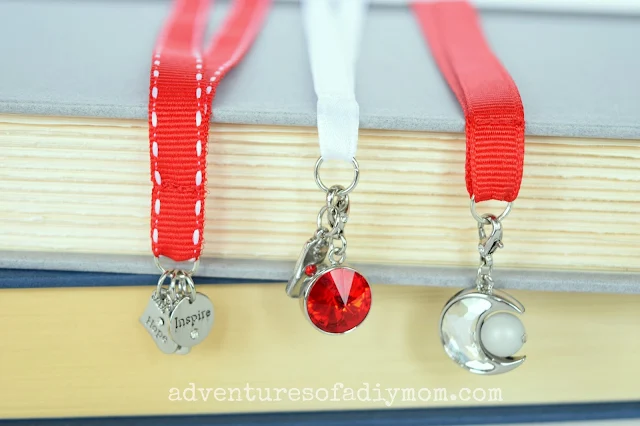
I always have a book on my nightstand waiting for me at the end of the day. I love to get lost in a good story. It helps me to forget about the stress or anxiety of the day and unwind.
Of course, that means I need to have pretty bookmarks to mark my spot. Ribbon bookmarks are simple, yet charming.
As a Cousin Corporation Ambassador, I get to try out new products and I'm loving these charms made with Swarovski® crystals. They are available exclusively at Michael's.
I had to come up with some non-traditional uses for these charms - in other words, I had to think outside of the jewelry box. I decided to make these ribbon bookmarks. Do you like how they turned out?
Related Projects
Check out the fabric embroidered bookmarks my daughter made for her siblings. Or this list of over 80 DIY bookmarks I recently compiled. Plus I re-purposed an old tin to make a bookmark box to corral all the kids bookmarks.
Check out the fabric embroidered bookmarks my daughter made for her siblings. Or this list of over 80 DIY bookmarks I recently compiled. Plus I re-purposed an old tin to make a bookmark box to corral all the kids bookmarks.
How to Make Ribbon Bookmarks with Charms
Ribbon Bookmarks are super simple to make. They really are a 5 minute project. Let's get started with the tutorial.
Supplies needed for ribbon bookmarks
- Ribbon
- Charms
- large jump rings
- scissors
- sewing machine/needle and thread or hot glue
- lighter or match {to melt ribbon ends}
Steps to Making DIY Ribbon Bookmarks
1 - Begin by cutting the ribbon to 26 inches.
2 - Slide a large jump ring onto the ribbon to the halfway point and fold the ribbon in half.
3 - Sew the ribbon together about 1/4 inch from the jump ring. Or, alternately, you could use a dab of hot glue to hold the ribbon together.
4 - Attach the charms to the jump ring. Most of the charms I received had a lobster clasp, so they were super easy to attach. The charms below only had jump rings. Jump rings are simple to open and close, but if you've never done it before you can watch this short how-to video.
5 - Trim the edges of the ribbon. Using a lighter or match, melt the edges so they don't fray. When you do this, you don't need to actually touch the ribbon to the flame, just get it close and the ribbon will start to melt.
There you have it! A quick and easy ribbon bookmark - now find a good book and get lost in it.

How to Make Ribbon Bookmarks with Charms
Yield: 1
Estimated cost: $5
prep time: perform time: 5 Mtotal time: 5 M
Ribbon Bookmarks are super simple to make. They really are a 5 minute project.
materials:
- Ribbon
- Charms
- Large Jump Rings
tools:
- scissors
- sewing machine or hot glue
- lighter or match (to melt ribbon ends)
steps:
- Begin by cutting the ribbon to 26 inches.
- Slide a large jump ring onto the ribbon to the halfway point and fold the ribbon in half.
- Sew the ribbon together about 1/4 inch from the jump ring. Or, alternately, you could use a dab of hot glue to hold the ribbon together.
- Attach the charms to the jump ring.
- Trim the edges of the ribbon. Using a lighter or match, melt the edges so they don't fray. When you do this, you don't need to actually touch the ribbon to the flame, just get it close and the ribbon will start to melt.
© 2019 Adventures of a DIY Mom


What a pretty and delicate-looking way to mark your place in a book! So much nicer than dog-earing the page!
ReplyDeleteWho knew something as ordinary as a bookmark could be so beautiful! Very nice.
ReplyDeleteLove your site...I am home from work recovering from spine surgery. I am definitely making the bookmarks to send to my daughters who live in Denver. I want to make the Easter eggs and put lights in them and hang them. Thanks for sharing your ideas
ReplyDeleteThat is so easy and I have lots of charms and beads left from jewelry making. Pinning so I can remember how to make a ribbon bookmark for myself.
ReplyDeleteWhat a cool idea! My jewelry design has gone toward wire-wrapping, and this has left me with an abundance of charms that will likely remain unused. Now I know what to do with them!
ReplyDeleteThanks so much! I'm a jewelry maker too but a friend asked for a bookmark and yours was the only site to show some neat alternatives to just slapping a clasp on the end. I suspect you saved me hours of beating my head against the wall! Will definitely pop by again to see what crafts you're getting up to :)
ReplyDeleteThanks so much I have been spending so much time trying to figure this out... And thanks to u... I've figured it out... What a simple thing to do... Thanks so much for the help... This is my mom's mother's day gift... In the year of 2021.
ReplyDelete