HOW TO MAKE A MANGER ORNAMENT
"And this shall be a sign unto you; Ye shall find the babe wrapped in swaddling clothes, lying in a manger." Luke 2:12
So I originally found this idea at It's Always Autumn. She has a printable pattern. The problem was that my printer wasn't working. Plus, I like working with actual measurements. So here's how I did it.
To make a Manger Ornament you will need:
paint sticks {the large ones from Home Depot, I've heard that paint sticks vary in size, so you may have to adjust your measurements if you use a different size}1/4" square dowels
hot glue
stain (optional)
saw
drill w/small bit
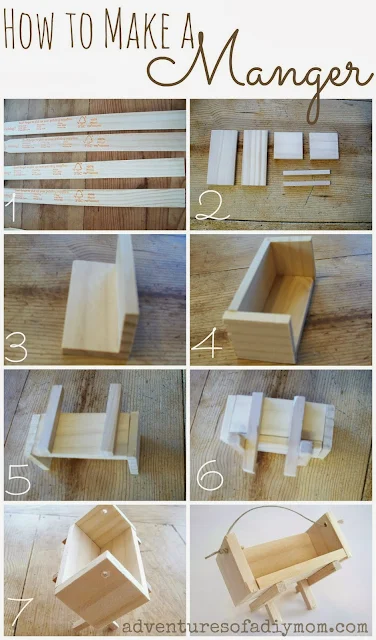
Step 1 - Sand off the writing that comes on the paint sticks.
Step 2 - Cut your pieces to the following measurements:
From paint stick:
Cut 2 - 1 3/8 X 1 3/8
Cut 1 - 2 3/4 X 1 3/8
Cut 1 - 2 3/4 X 1 1/8
From square dowel:
Cut 4 - 2 1/4"
*Note - I just realized my picture has only 2 dowel pieces. You will need 4.
If you desire to stain your wood, do so before gluing together.
Step 3 - Start with your 2 3/4" sized pieces. Hot glue the smaller one to the larger one. I found if I held one of my square pieces next to it, I could get it square.
Step 4 - Hot glue the square ends of the manger in place.
Step 5 - Hot glue two of your square dowels to the side of the manger. {See picture for placement}
Step 6 - Hot glue the other two square dowels to the other side of the manger. {See picture for placement}
Step 7 - Drill a small hole at each end of the manger.
Step 8 - Add some twine or wire for hanging.
Be sure to check out my other Nativity ornaments:
Wood Slice Nativity Ornaments
Angel Wire Ornaments
Clothespin Nativity Ornament
Twine Wrapped Star
Sheep Ornament
Felt Nativity Ornament
Shepherd's Crook Ornament
Stable Ornament
Wiseman Ornament
Manger Ornament
Canning Ring Framed Embroidered Ornament
Paint Stick Ornament
Greeting Card Ornament


Love your Nativity ornaments! So meaningful! It is what Christmas is all about!
ReplyDeletePhyllis@grandparentsplus.com